Let’s talk about keyboards
Last year I discovered the world of ergonomic keyboards. I was looking for a way to make my hands hurt less during the day and learned that there were keyboard layouts out there with different physical properties for the keys; most of them ditched the row stagger for something else, some ditched a space bar and used thumb clusters instead, some were split in halt, and all of them caught my attention.
I talked myself into an expensive purchase and ordered an Ergodox EZ. It was wild, and I loved it. I fell head over heels for layers, where holding one key changes the function of other keys. It was amazing.
Then the company which makes the Ergodox released a new product, and a couple of weeks later I had a Moonlander in my hands. It was basically the same thing as before but the thumb cluster was better, and I couldn’t help myself.
But as I started to use the keyboard I realized that it had a problem: there were just too many damn keys. Layers had taught me that you can do a whole lot with just the homerow, but I still had to reach for numbers and function keys. Clearly, that was unacceptable. I found keyboards out there that got rid of the number row, and that was cool… but, you know, not cool enough. Then I discovered the Corne Keyboard (henceforth: crkbd).
I wanted one, but the darn thing premade was pretty expensive, and I had hundreds of dollars worth of keyboards already. There was only one solution, I needed to learn to solder so that I could build my own. So learn I did, and pretty soon I had my first crkbd all set up.

Let’s step back a bit, and revisit that first Ergodox I bought. In addition to the cool new physical form factor of the keyboard, I also discovered that there were alternate key layouts as well. What you probably use is called “qwerty”, because if you read from the top left of the upper row that’s the order of your keys. A brief history lesson will teach you that this layout was not the original layout for typewriters; they used a layout which is actually more efficient and lets you type faster… so much faster that the levers for each key would actually bind up. Qwerty was designed to slow typists down so they wouldn't break the thing. Today’s keyboards don’t risk binding up, but we still use qwerty for some reason.
Not me, though. See, I’m too cool for that, and when I got my Ergodox I switched to Colemak, a keyboard layout designed to keep the most commonly used keys on the homerow. Some people will tell you this makes you faster, but that hasn’t been my experience. I actually go a bit slower with Colemak… but the reduced finger travel contributes to making my hands hurt less and I’m very happy with the decision to switch… even though it took me months to be mildly proficient with this layout (and I still make lots of typos today).
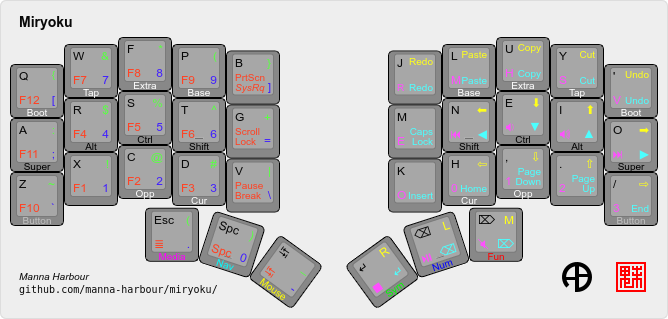
So, when I switched to my crkbd, I decided to mix things up a bit and I adopted miryoku, the keyboard layout for masochists. No number row, no sixth column, heavy layer usage. I love it.
I was on a roll. I had a keyboard I liked, a layout I liked, and I was happy. Obviously, I needed to keep changing things. So I made a crkbd with MX Cherry style keycaps.

Nice, and I added leds this time… but it was too tall. The low profile Kailh style switches were certainly my preference. Ok, so lets try wireless!

Super neat, and removing the outer column this time was a big improvement... but the battery maintenance was less than great. Not good enough. Lets try wired, but this time with no outer column again and also clicky keys so everyone around me hates me.
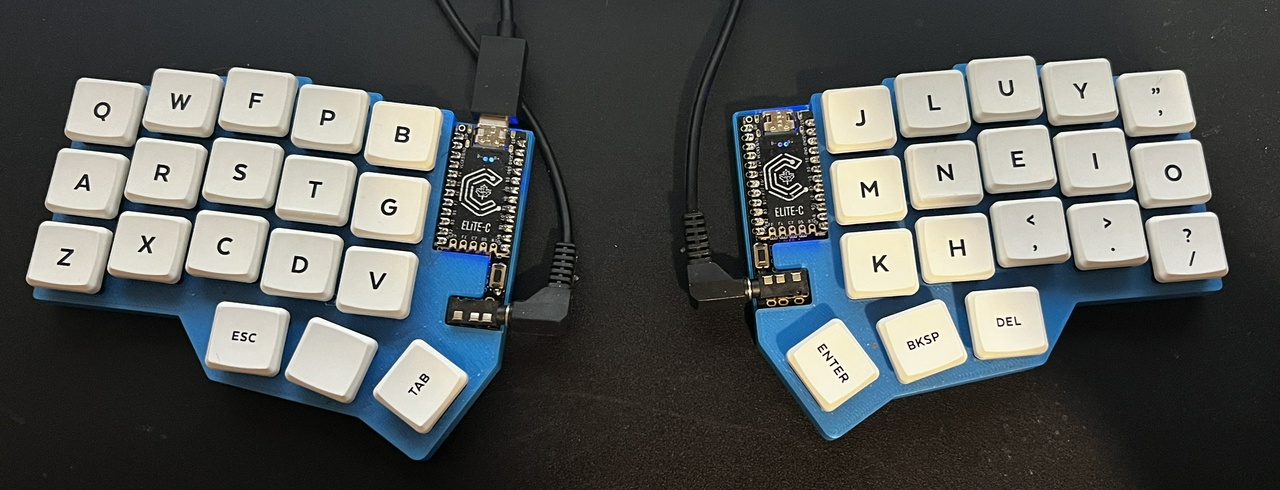
Now we’re talking! This is the keyboard I use today. It’s not the end of this story though.
You may have noticed that nice blue case for the keyboard in the above image. Turns out when you go far, far into niche territory support for things like cases becomes… troublesome. I could not find a case that met all my wants; so, I made one.
Another of my hobbies is 3d printing. I have recently started to learn CAD design, and felt like it was time to actually solve a problem with it. I took the kicad files from the crkbd website (what you would send to a manufacturer to get PCB boards made), pulled the PCB model out of it, and used it to design my case from scratch.

I’m pretty proud of this, and I love that it connects together with magnets.

If you happen to be in the market for a 3x5 crkbd case with cutout for the microcontroller, reset switch, and TRRS connector, you can find my print files my printables.com entry.
So that was my journey into the deep end of esoteric nonsense keyboards. Try not to think less of me.